


After doing a visual assessment of the standing dog, the next step, as it is in the show ring, is the hands-on examination by the judge. As a breeder, there are many areas on your dog that you must physically examine to determine if they are correct for your breed. On a coated breed, there are more areas that must be physically checked than on a smooth coated breed. The bite, the zygomatic arch, and the true formation of the top skull are just a few areas that you will need to put your hands on to determine what is real and what is an illusion of coat or grooming. Since this series is on form and function, we will be dealing mostly with the structures having to do with movement and leave the other areas for another day.
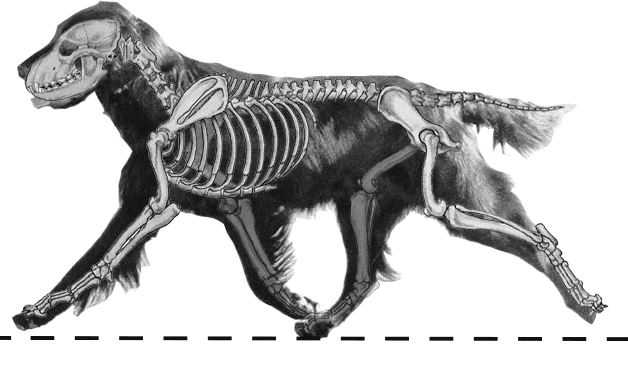
When examining a dog, to be precise, it would be lovely if each of us had access to radiographic machines so we could determine exactly what we were seeing from the outside of the dog. Since few of us have this ability, we will search out the exterior landmarks we can either see or feel in order to try to determine the skeletal structure that lays beneath the coat, skin, and musculature.
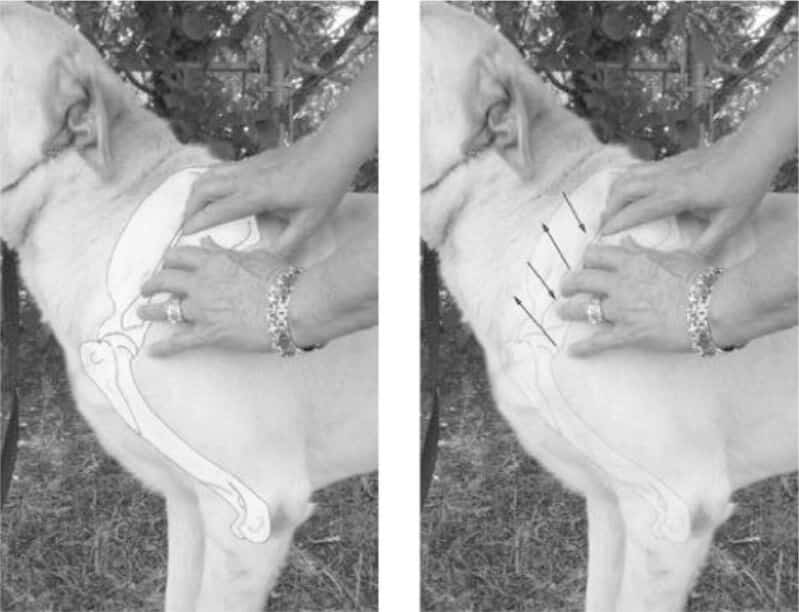
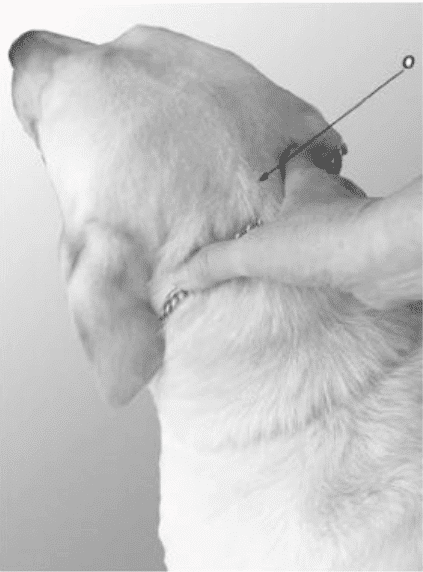
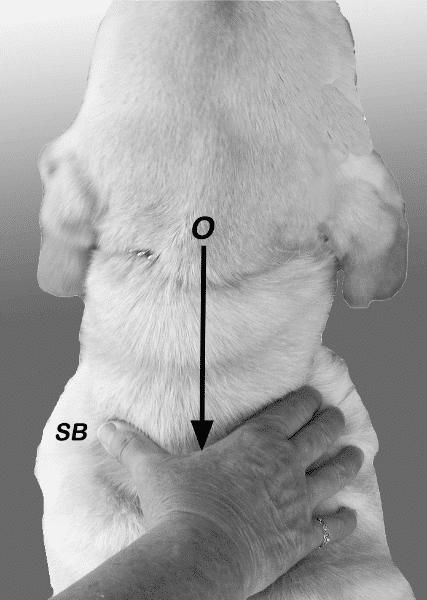
It is relatively easy to check the neck’s arch and length by simply putting your hand behind the occiput (O) of the skull. See Figure 1.
From this location, follow the line of the neck with your hand until it stops at the shoulder blades (SB). See Figure 2.
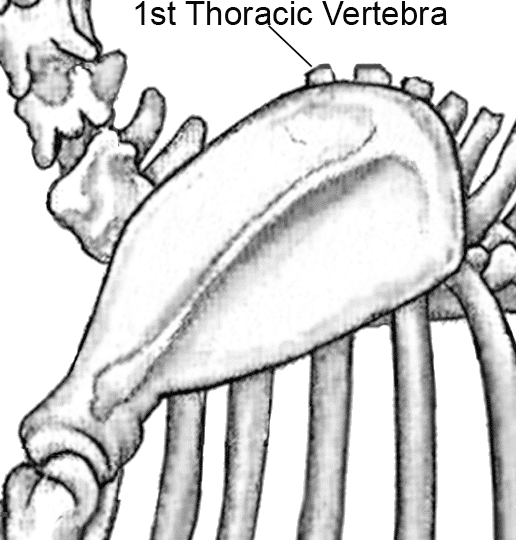
One can also find the end of the neck and the start of the thorax by palpating gently with their finger or thumb for the end of the cervical vertebrae and the more upright projection of the first thoracic vertebra. See Figure 3.
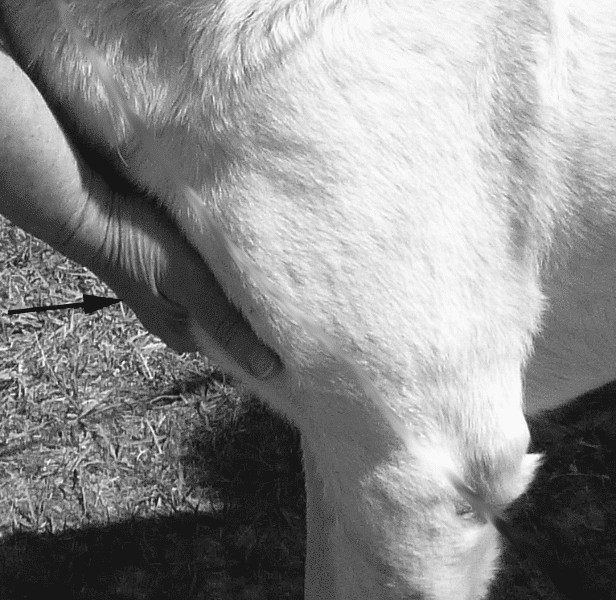
To feel the prosternum, simply put your hand, palm up, at the bottom of the neck. The prosternum should fit into the palm of your hand (indicated by the arrow in Figure 4).
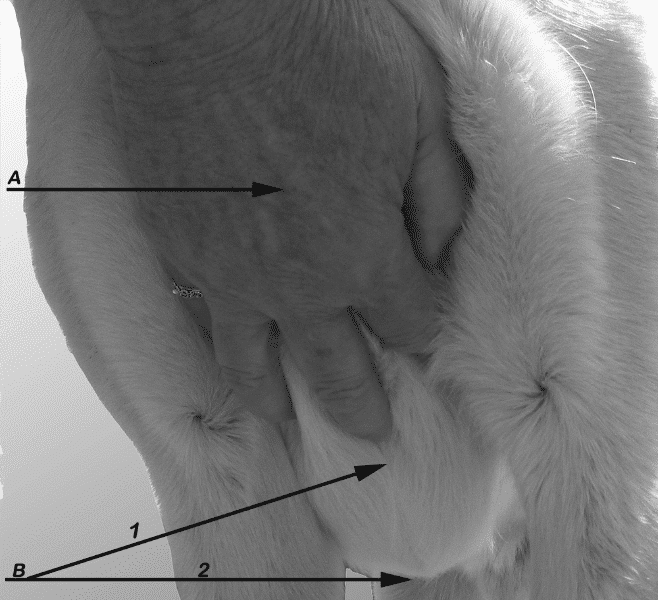
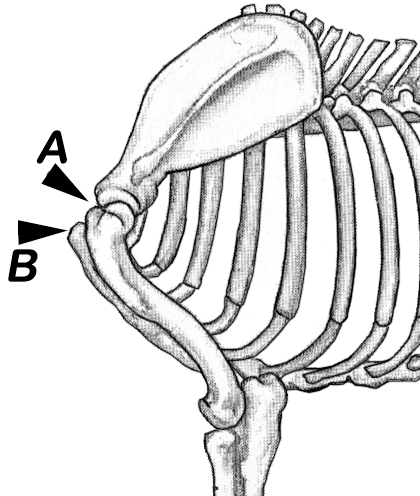
With your hand placed on the dog’s chest, your fingers should be able to reach between the legs and feel how the ribs end at the sternum (brisket) beneath the dog. (See Figure 5.) For all but the most rounded chest shapes, this should feel somewhat akin to the keel of a boat in the way the ribs reach down from the spine and attach at the sternum. With this simple gesture, you will be able to determine the width of the chest, the depth of the chest, and a bit of the shape of the chest by the way the prosternum (arrow A) and sternum, which runs under your fingers from the prosternum backwards under the dog for rib attachment (Arrow B: 1 through 2 and back), fit into your hand.
The next all-important step is to try to determine the layback of the shoulder on your dog. When you are considering the front assembly, I think the very first thing you must remember is that the shoulder assembly is “held on” only by muscles and ligaments, referred to as the shoulder girdle group, unlike the rear assembly, in which the hip is fused to the vertebrae that form the sacrum, thus forming a much more rigid connection than in the front.
The front end is mostly used for its “pole vault” effect, while the rear is the motor that pushes the dog along. A dog does not pull itself forward as much from the front but rather is pushed along more from behind. (There is some pulling action on the front end, but it is not the major driving force that propels the dog forward.) It is extremely important that both ends of the dog are in balance.
What most of us think of when dealing with a front assembly is the term “angulation”. This is just a part of it, but it does determine the distance (reach) a dog is capable of when the front leg is reaching forward. What we must learn to do is feel for the landmarks that we can determine when palpating through the skin, muscles, and fat in order to ascertain the angulation of the canine. This is easy to feel if you know where to put your hands.
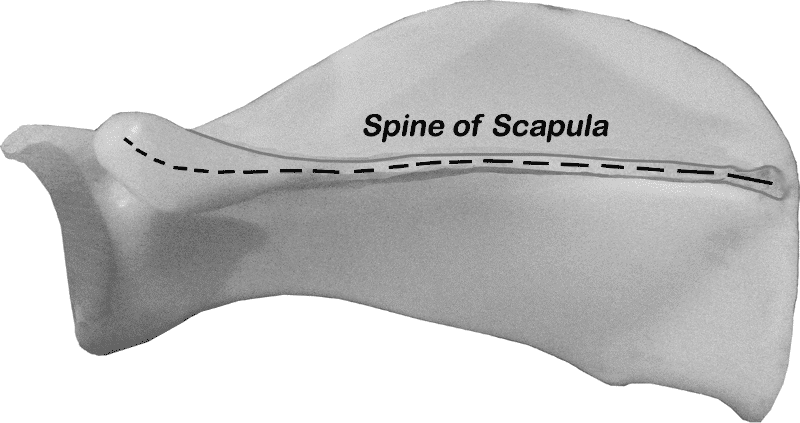
The shoulder blade (scapula) (Figure 6) is a wide, flat bone with a ridge running right down the center. The ridge, called the spine of the scapula, is there for attachment of the muscles; the longer the shoulder blade, the more attachment; the shorter the blade, the less attachment.
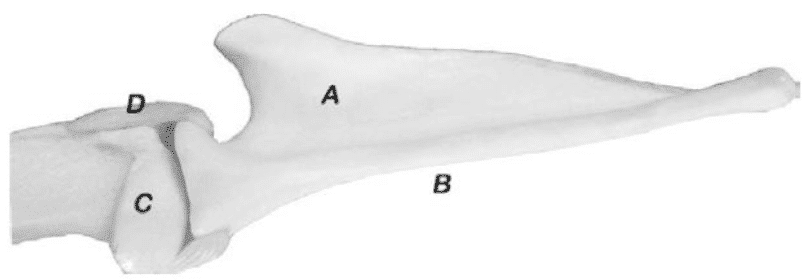
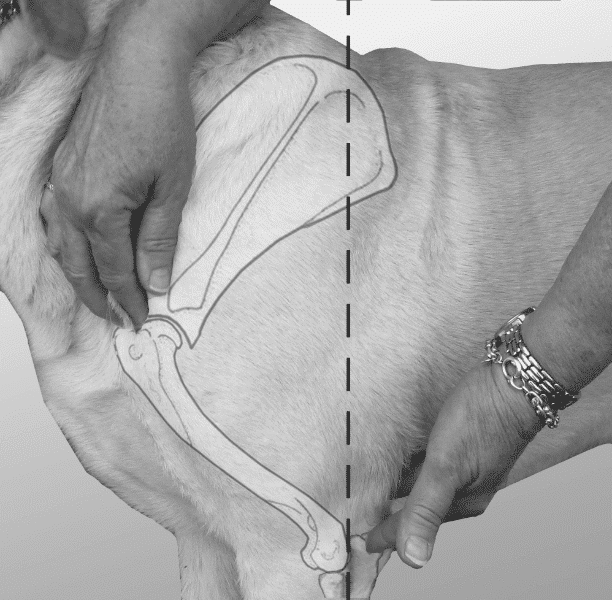
The spine of the scapula is much easier to see in profile. The spine is marked “A” in Figure 7. From this illustration, it is easy to see how prominent it is and how it could support the attachment of muscling. The surface marked “B” is the side that lays flat against the ribcage and is smooth so that it more easily oscillates against the ribs. The bone marked “C” is the upper arm, and “D” is the ligament (on both sides) that enables the articulation of the two bones.
If you put your dog in a show stance with the elbow under the withers and the front feet in the proper position (positioning the foot either forward or further back can change the angle of the shoulder blade; lowering or raising the head can throw it off, too), you can easily find the spine or ridge along the shoulder blade.
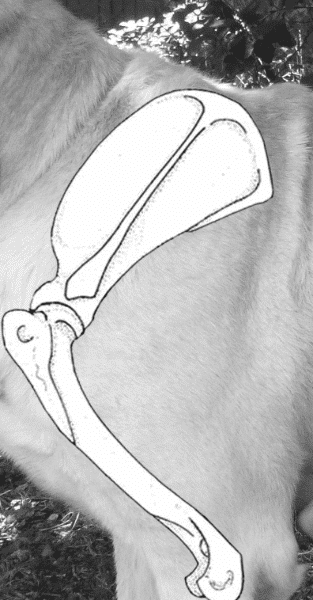
If you put your dog in a show stance with the elbow under the withers and the front feet in the proper position…you can easily find the spine or ridge along the shoulder blade.
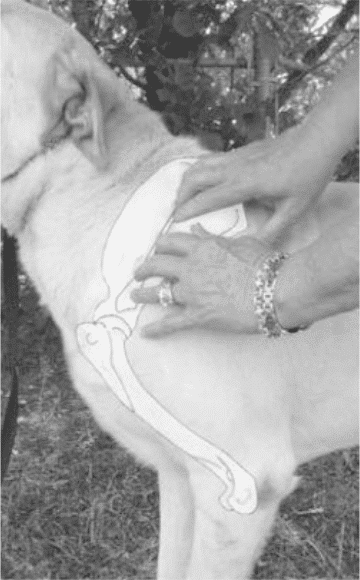
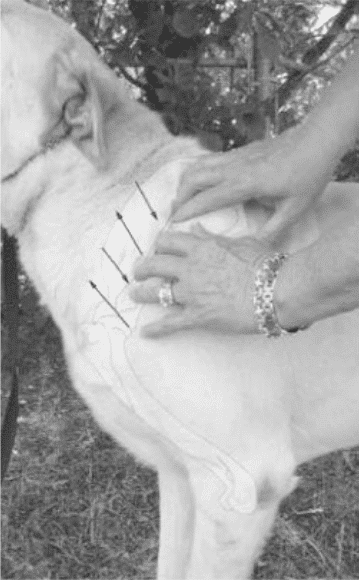
I place my fingers along where I think the spine of the shoulder blade is located (Figure 9) and gently move them back and forth as indicated by the arrows to locate the actual ridge. The trick is to place the fingertips with the pads of the fingers over where you think the shoulder blade lies on the body. By rotating the skin back and forth as shown, you can actually feel the protrusion that is the spine of the scapula. By following this ridge down toward the point of the shoulder and up towards the withers, you know the actual layback of the shoulder blade. This is a more accurate representation of the shoulder layback than just “spotting” what you think is the top of the shoulder blade and the point of the shoulder.
Once you have determined the line of the ridge, you can see exactly whether the blade is well laid back (pointing further toward the back of the dog) or more upright (pointing more at the sky than at the dog’s tail). See Figure 10.
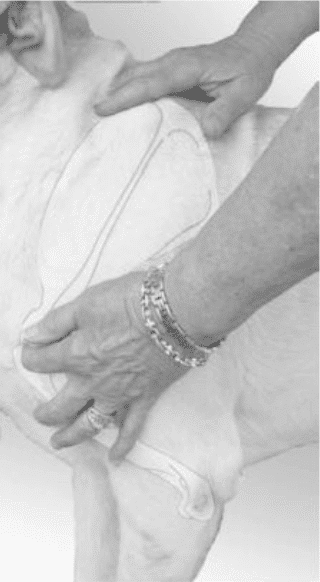
Next, by placing your fingers at the point of the shoulder, you can actually feel a notch at the joint where the shoulder blade meets the upper arm. See Figure 11.
What we consider to be the point of the shoulder is actually the outside “bump” of the end of the humerus or upper arm (Figure 12 “B”), with the inside “notch” (Figure 12 “A”), which is actually the ball and socket joint of the shoulder blade/upper arm junction. In most breeds, the upper arm is actually longer than the shoulder blade, but due to the landmarks we can actually palpate, it makes it seem that the upper arm and shoulder blade are of equal length.
From the point of the shoulder, it is easy to palpate the end of the upper arm at the elbow. The upper arm should “return” back underneath the dog’s body to be positioned roughly under the wither at the highest point of the shoulder blade. This is what is meant by ‘return of the upper arm’.
While layback and reach together are just one component of the front assembly on a dog, they are an extremely important one to understand. I have known some dogs that could actually “outreach” their layback! These dogs were few and far between and usually had more relaxed ligamentation throughout the body. Also, some pups seem to move so well in the front reach department and seem to have such a lovely reach of neck until they mature, when the forward stride becomes shortened and they take on a stuffy look.
Once those muscles develop and ligaments tighten up, you can see an appreciable difference in their gait and outline. The forward reach of a dog is usually about the same angle as the shoulder blade at rest. The length of the upper arm can also affect forward reach. A short upper arm also shortens the reach in front. See Figure 14.
In most breeds, the upper arm is actually longer than the shoulder blade, but due to the landmarks we can actually palpate, it makes it seem that the upper arm and shoulder blade are of equal length.
Whenever you discuss the bone structure of the dog, you must remember that the bone has no way of creating motion; it is a support structure only. It takes muscles to move those bones. Overall conformation is determined not only by the condition of the muscles but also by their size, shape, and distribution in conjunction with the skeleton of the dog. Some dogs have shorter, “bunchy or weightlifter” muscles; others have longer, sleeker muscles—think Bull Terrier and Whippet as examples. You don’t want bunchy muscles on a Whippet, nor do you want to see the sleeker, long-distance-runner muscles on a Bull Terrier.
A dog with upright shoulders and straight stifles may have the same length of back as a better-angled dog but will look much shorter overall. Dog with a shortened front reach will also have some bounce over the withers due to pounding; the front leg is literally pounded into the ground by the rear drive of the dog. A dog with lesser rear angulation will not produce as much pounding or bounce as a dog with straighter front angulation because they are more in balance (there’s that word again!).
Whenever you discuss the bone structure of the dog, you must remember that the bone has no way of creating motion; it is a support structure only. It takes muscles to move those bones.
The next thing I would like to address is the placement of the shoulder blade on the side of the dog’s chest. When the shoulder blade is set properly on the side of the chest, there will be a nice rounding of the chest. If they are set too far forward, the blades will point towards each other, and you will often see a dog out at the elbows that also toes in. When shoulders are placed too far forward, the muscles holding the blade in place are usually not strong enough to prevent paddling or other time-wasting motions when the dog is coming toward you at a trot. See Figure 15.
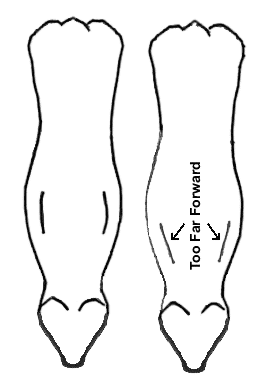
The figure on the left shows the proper placement (often referred to as the way the shoulder blade is “laid on” as opposed to “layback”) of the shoulder blade. The dog on the right has shoulder blades that are placed too far forward on the chest of the dog. You can easily see how the blades point toward each other more, which could cause the elbows to turn out and the feet to toe in.
Paddling is seen when viewed from the front. The dog has a loose front that has a circular motion of the front feet. The motion is reminiscent of the motion of the paddle when paddling a canoe. The blade of the paddle must turn or else the canoe will go in a circle, hence the name paddling. The most common causes are muscles that are too loose, a shortened upper arm, or shoulder blades that are too far forward on the chest. Faulty motion such as paddling can be seen in the front because the ball and socket joint of the shoulder (where the shoulder blade and upper arm meet) allows more lateral freedom of motion (other than just forward and backward) so that you can get the leg moving in a circular motion.
Even though the shoulder joint can move in all directions because of the placement and attachment of the muscles and the way the cavity of the socket of the joint is formed, there is still more freedom of motion back and forth. The other joints in the front leg are hinges (such as at the elbow), which basically only allow for motion toward the front and toward the rear.
In the next installment, we will continue with the physical examination of the dog. If you have any questions or comments, you may contact me at jimanie@welshcorgi.com.
Form Follows Function Part 5: The Hands on Exam – Training Your Hands to Feel What You Can’t See.
From the May 2019 Issue of Showsight Magazine.
This series originally appeared in the Working/Herding Digest. All rights reserved by the author.